AMP stands for ‘Accelerated Mobile Pages.’ AMP google is specially designed for improving mobile web traffic and improving the site’s loading speed. Before looking at the topic How to Remove Google AMP Pages in WordPress. Need to know what is AMP
What is AMP?
AMP pages are written in AMP HTML. Accelerated Mobile Pages (AMP) is an open-source project. It provides a framework for creating consistently fast-loading content pages. It aims to make the mobile web better.
The average AMP page from Google search loads in less than 1 second, and because of this, publishers have seen an increase in traffic and time spent on the page.
Check out when you free – World’s first automatic and online HTML to WordPress converter
AMP Benefits
- Prioritizes the user experience
- Limiting CSS to 75KB.
- Achieve the lightning load speed
- Increase Mobile Ranking
- Improve CTR
- Less data consumption,
- Improved server performance
- A free CDN, and higher ad viewability.
Why Remove Google AMP Pages in WordPress?
With all the benefits, why remove Google AMP Pages in WordPress? There are some problems with this technique. These are useful for anyone. Before that, I will tell you who will benefit from this and who will not need it.
AMP is very beneficial for news channel owners, Affiliate Marketers, and e-Commerce website owners.
Similarly, AMP is not good for those who want to earn from the blog, or those who run a website for a company (the website represents that company) and expect conversion.
Many WordPress bloggers affects and complaints about the AMP issue, which increases traffic when using AMP. But their revenue is dropped drastically by 50-60 percent. Even the revenue that was already coming in is declining. So This is not good for bloggers.
Similarly, company owners may have created their websites to attract clients. But AMP has only some specific designs. So they cannot design as they wish. Not only that, but their conversion rate also has decreased by 50-60 percent.
Cons of AMP
- Decrease In Ad Revenue
- Decrease Conversion Rate
- Analytics Is Stripped Down
- Google Cache Server
- AMP pages will not show email popups and opt-in forms
Simple Steps to remove AMP pages properly
The majority of bloggers feel ‘AMP google’ is a monster that is dropped their earnings and AMP can’t do much to encourage users to subscribe, and fill out contact forms. So they prefer to remove google AMP pages from WordPress.
1. Set Redirects in .htaccess
First, login to cPanel and do manual redirection in your domain’s .htaccess file. Please follow the steps.

htaccess-file-download access file download
i. Login cPanel and then open File Manager. Select your domain there and download the .htaccess file inside it.

amp manual redirection
ii. Right-click the downloaded file and edit it. Then add the code I give below “RewriteEngine On”.
// Redirect AMP to non-AMP
RewriteCond %{REQUEST_URI} (.+)/amp(.*)$
RewriteRule ^ %1/ [R=301,L]
After adding, the code will look like this.
// Redirect AMP to non-AMP
RewriteEngine On
RewriteCond %{REQUEST_URI} (.+)/amp(.*)$
RewriteRule ^ %1/ [R=301,L]
Save after adding.
3. Upload .htaccess file to the server after saving the code
2. Deactivate AMP Plugin from WordPress Dashboard
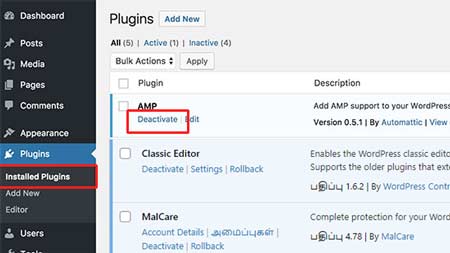
Remove Google AMP Pages in WordPress
There are many plugins for Google AMP. Login to WordPress and deactivate the plugin you have installed.
WordPress login > Plugins > Installed Plugins > AMP > Deactivate
After Deactivate the plugin delete it.
3. Redirection Plugin for WordPress

WordPress Redirection Plugin
First you need to install and activate the Redirection plugin. After logging in to WordPress, click Plugins on the left.
Click on add plugin above. Now type Redirection in the search box. Install and Activate the Redirection plugin identified in the image.
After activation, go to Tools inside the Redirection Plugin and click on the Redirection Tab.
Click on WordPress > Tools > Redirection.
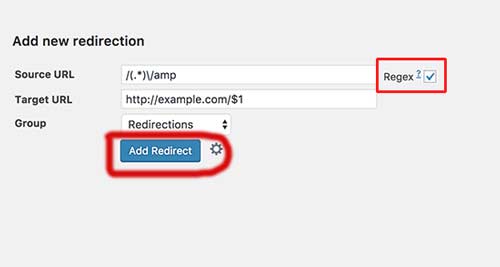
Add Redirection
Now a window will open. Paste the below-mentioned code in “Source URL.”
/(.*)\/amp
Paste below-mentioned code in “Target URL”
http://example.com/$1
Remember that “http://example.com” is your domain name.
Then select the Regex tick box on the right side and click Add Redirection. Regex selection, redirects all your amp page URLs to the normal page.
4. Disable Auto AMP off in Google Adsense(for Bloggers)
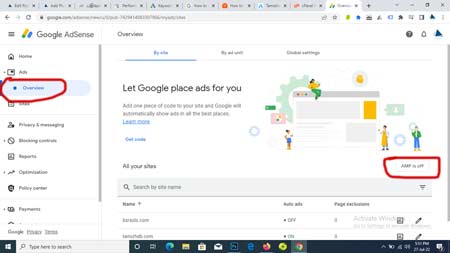
AMP off in Adsense
Login to Google Adsense and click on overview under the Ads tab. Click AMP is OFF
Also, Remove AMP Adsense codes on your website. in detail find google support for removing amp content
Conclusion – Follow all the above steps one by one and remove AMP. I hope this article will be useful for you.
Read More
- WordPress Admin Login Issue
- How to Recover Lost or Forgotten Password For WordPress Admin
- How to Move WordPress Site to New Host without Plugin
- Check out when you free – World’s first automatic and online HTML to WordPress converter
- Technolgy Related Articles
- Blogging Articles